 Languages
Check Extruder Screw Wear Without Teardown
How to Diagnose Extruder Screw & Barrel Wear Without Pulling the Screw
Pulling a screw just because output “feels lower” can waste labor, downtime and maintenance cost. Waiting until the extruder can no longer hold output is even worse.
That leaves processors trapped between two expensive extremes:
- Blind teardown
Stop production, remove the screw, inspect everything — only to discover that the real problem was feeding, temperature control or the screen pack. - Blind waiting
Keep increasing RPM and adjusting temperature until output collapses and the line is forced into an unplanned shutdown.
A better approach is to use operating data to determine whether the screw and barrel have entered a likely wear condition before teardown.
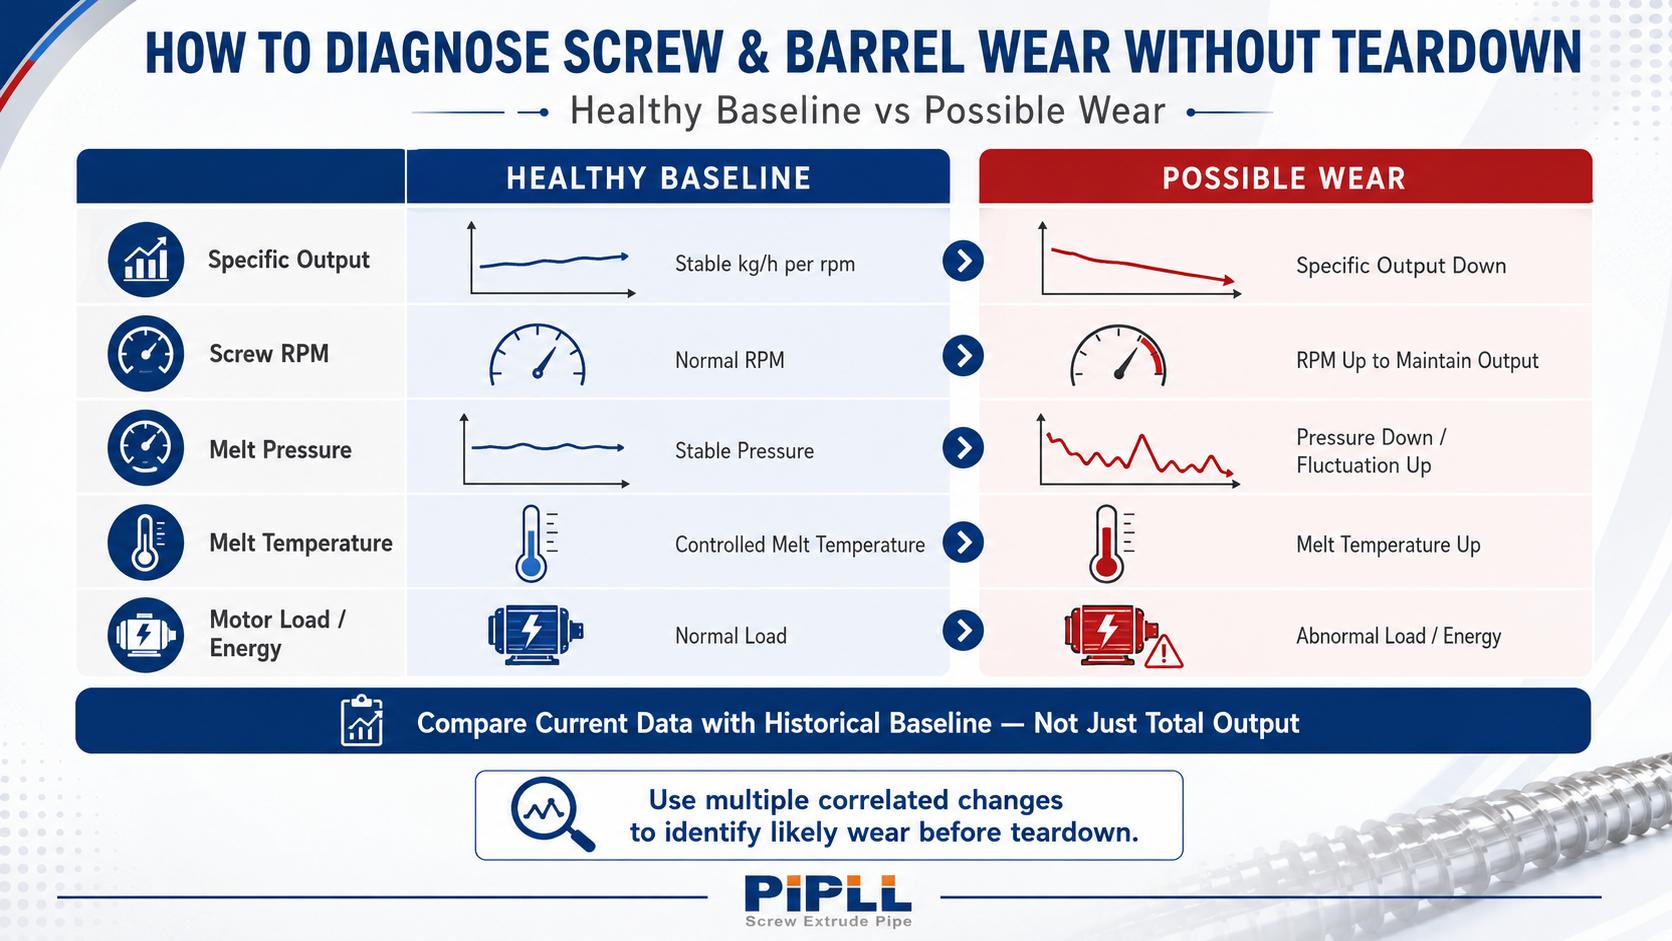
You cannot measure exact screw‑to‑barrel clearance without physical inspection. But you can often identify a high‑probability wear condition by checking four groups of process signals:
- Specific output
- Heater / self‑heating behavior
- Feed and vent behavior
- Maximum melt‑pressure capability
If several of these indicators deteriorate together under comparable production conditions, the screw and barrel should move to the top of the inspection and spare‑parts list.
- Blind teardown
Why Wear Changes Extruder Behavior
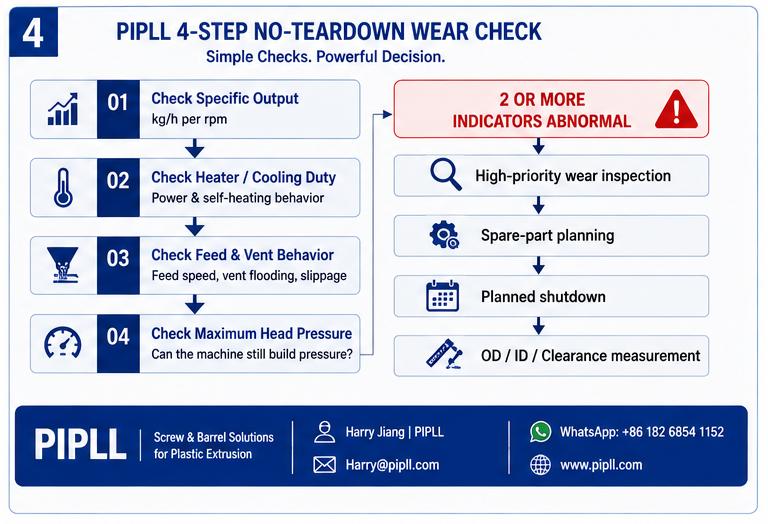
As the screw flight and barrel bore wear, the working clearance increases.
This reduces the screw’s ability to:
- Convey material efficiently
- Seal melt between flights
- Generate pressure
- Maintain stable forward flow
The result is not always an immediate shutdown. More often, the machine gradually loses mechanical efficiency.
That is why the most useful question is not: “Is the screw still turning?”
It is: “Is each screw revolution still doing the same amount of useful work?”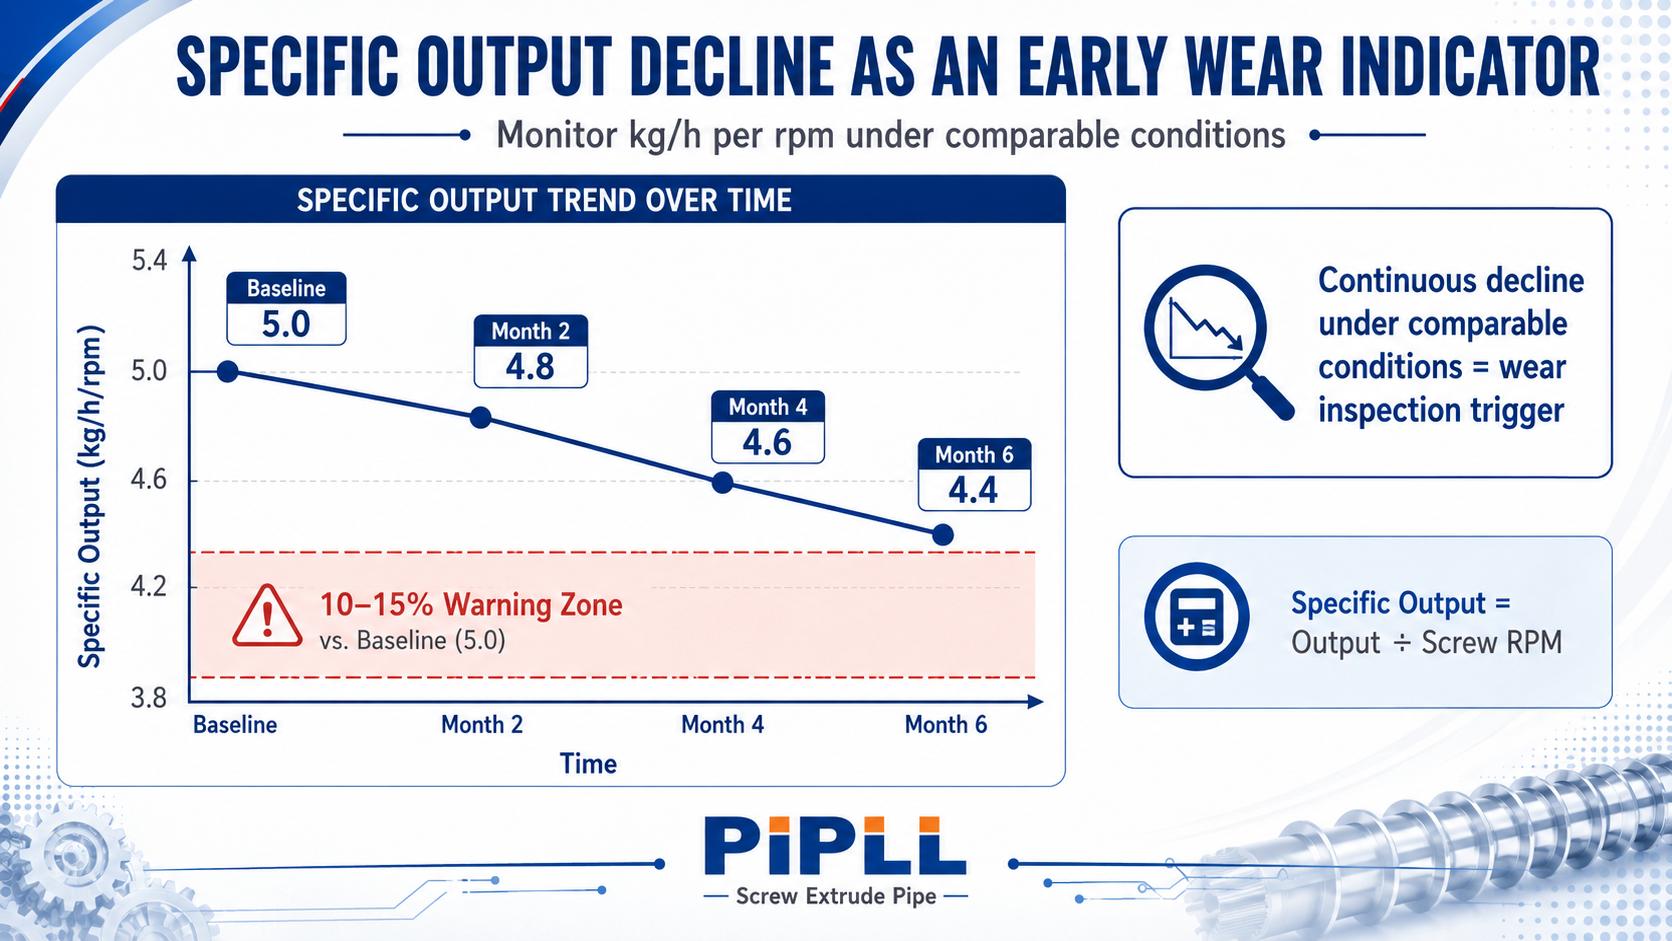
STEP 1 — Check Specific Output
The first and most important indicator is:
Specific Output = kg/h ÷ Screw RPM
Do not look only at total output. A line may still produce the same kg/h simply because operators keep increasing screw speed.
Condition Output Screw Speed Specific Output Historical baseline 300 kg/h 60 rpm 5.00 kg/h/rpm Later 300 kg/h 66 rpm 4.55 kg/h/rpm Later 300 kg/h 70 rpm 4.29 kg/h/rpm Total output still looks normal. But the screw now needs more revolutions to move the same amount of material. That is a direct sign that extrusion efficiency has deteriorated.
What Trend Matters?
A single bad production run means little. What matters is a continuous, monotonic decline under comparable conditions.
If specific output falls steadily over time and the decline reaches roughly 10–15% from the established healthy baseline, the screw/barrel condition should be treated as a serious inspection trigger.
Do not use 10–15% as a universal geometric wear limit. Different machines, polymers and screw designs tolerate different clearances.
Use it as an operational alarm threshold:
Specific output down 10–15% + no major change in material, die or process = investigate wear.STEP 2 — Watch Heater Power and Self‑Heating Behavior
Most operators watch barrel temperature. Fewer watch how much heater or cooling power is required to maintain that temperature. That is a missed diagnostic signal.
Pattern A — Electrical Consumption Becomes Abnormally High
If the extruder requires more total electrical input to maintain the same output, specific energy consumption may be increasing.
- Lower mechanical efficiency
- Higher RPM required for the same output
- Poorer plasticization
- Increased residence time or backflow
- Process instability
This does not prove screw wear by itself, but combined with falling specific output it becomes meaningful.
Pattern B — Self‑Heating Behavior Changes Sharply
Another warning sign is abnormal viscous heating. For example:
- Barrel heaters are switched off
- Cooling is already active
- But actual melt or zone temperature still refuses to fall
This may indicate intense local friction or material residence in certain zones.
However, wear does not always mean “more self‑heating.” Depending on where the wear occurs and how the material moves, you may instead see reduced shear generation, more heater demand, or localized overheating caused by material recirculation / stagnation.
The useful diagnostic question is: “Has the heater/cooling duty changed significantly compared with the healthy baseline at the same material, RPM and output?”
STEP 3 — Observe the Feed Throat and Vent Port
What to Watch at the Feed Throat
- Feeding becomes noticeably slower
- Material level fluctuates abnormally
- Pellets appear to rotate or slip instead of moving forward
- Screw seems to “spin without biting”
- Feed rate no longer increases proportionally with RPM
This suggests that the screw may be losing effective solids conveying.
What to Watch at the Vent Port
- Frequent material rising at the vent
- Repeated vent flooding
- Melt or compound escaping more often than before
- Frequency increasing as operating hours accumulate
Possible causes include poor melting sequence, excessive upstream pressure, poor screw filling balance, backflow, incorrect screw geometry, or wear‑related loss of conveying efficiency.
One vent event does not prove wear. But if vent carryover becomes progressively worse at the same formulation and process settings, it is a valuable clue.
Backpressure Slippage and Loss of Forward Pumping
As wear becomes more severe, the screw may lose its ability to maintain forward pressure.
- Screw speed increases but output responds slowly
- Material movement appears weak
- Feed becomes increasingly sluggish
- Melt or compound moves backward toward the vent
- Pressure is difficult to build
In severe cases, the machine appears to be working mechanically, but a significant portion of the screw’s rotation is no longer producing useful forward flow. This is the practical meaning of losing pumping efficiency.
STEP 4 — Test the Maximum Melt‑Pressure Capability
This is one of the strongest functional tests available without pulling the screw.
A healthy metering section should still be able to generate and hold pressure against a known downstream resistance.
The question is: Can the extruder still build the pressure it used to build?
Under a controlled and safe test condition, compare screw RPM, material, melt temperature, die / filter condition, downstream resistance, and maximum stable head pressure with historical data.
If downstream resistance is increased within the machine’s safe operating range, but head pressure cannot rise as expected, the screw may be losing sealing and pumping capability.
This can happen when increased screw/barrel clearance allows more melt to leak backward across the flight tips.
A Strong Warning Pattern
- Historical condition: 60 rpm → stable 180 bar
- Current condition: 60 rpm → only 145 bar
Then RPM is increased, but pressure still cannot recover proportionally.
If material viscosity is comparable, screen/die condition is known, temperature is controlled, and the pressure sensor is working correctly, then loss of pressure‑building capability strongly points toward mechanical inefficiency in the screw/barrel system.
Do not deliberately over‑restrict a line beyond OEM pressure limits. This test should always remain inside the machine’s safe operating envelope.
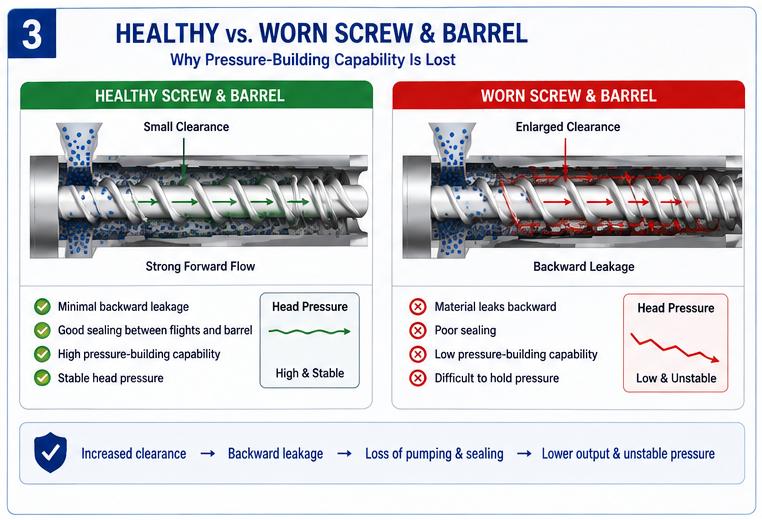
The PIPLL 4‑Step No‑Teardown Wear Check
-
1. Check Specific Output
Ask: Is kg/h per rpm steadily declining?
Warning: Continuous decline of approximately 10‑15% from the established healthy baseline. -
2. Check Heater / Cooling Duty
Ask: Does the machine now require significantly different heater or cooling power at the same production condition?- Higher specific energy consumption
- Abnormally high heater demand
- Temperature remains high even when heaters are reduced/off because of excessive internal friction
-
3. Check Feed and Vent Behavior
Ask: Is forward conveying becoming weaker?- Slower feeding
- Pellet slippage
- Weak response when RPM increases
- Frequent vent flooding
- Increasing material carryover
-
4. Check Maximum Head Pressure
Ask: Can the machine still build the pressure it used to build?
If pressure capability has clearly deteriorated under controlled comparable conditions, sealing/pumping efficiency may already be compromised.
A Simple Decision Rule
Do not diagnose wear from one abnormal number. Use correlation.
Check Normal Warning Specific output Stable Continuous decline Heater / cooling behavior Similar to historical baseline Significant duty change Feed / vent behavior Stable forward conveying Slippage / slow feed / vent flooding Maximum head pressure Builds normally Cannot reach historical pressure If only 1 of 4 is abnormal
Investigate other causes first:
Raw material · Feeder · Temperature control · Filter · Die · SensorsIf 2 or more of 4 deteriorate together
Treat the machine as a high‑priority screw/barrel wear case.At this point, it is reasonable to:
- Prepare replacement drawings
- Confirm screw/barrel dimensions
- Start spare‑part quotation
- Plan inspection downtime
- Arrange teardown measurement at the next suitable maintenance window
This does not mean exact clearance has already been measured. It means the probability of meaningful mechanical wear is high enough that waiting for complete failure is no longer a good maintenance strategy.
Why This Is Better Than Blind Teardown or Blind Waiting
Mistake 1 — Tear Everything Down Too Early
A technician sees unstable output and immediately pulls the screw. Then the team discovers the screw is still acceptable, the feeder was unstable, the thermocouple was faulty, or the screen pack was blocked.
Result: Lost production + maintenance labor + unnecessary downtimeMistake 2 — Wait Until Production Stops
The opposite strategy is: “It is still running. Keep going.” Operators compensate with more RPM, more heat and more parameter adjustment until output can no longer be maintained, product quality becomes unacceptable, pressure becomes unstable, or the line must stop unexpectedly.
Result: Emergency shutdown + urgent parts + lost orders + higher maintenance costThe Better Strategy: Diagnose First, Schedule Second
The objective of no‑teardown diagnosis is not to avoid mechanical inspection forever. It is to decide when inspection becomes economically justified.
Production Data → 4‑Step Wear Check → Wear Probability → Spare‑Part Preparation → Planned Shutdown → OD / ID / Clearance Measurement → Repair or Replacement Decision
This converts screw/barrel maintenance from emergency response into planned maintenance.
What Ultimately Confirms Wear?
Operating data tells you that efficiency is deteriorating. Physical measurement tells you how much wear exists and where it is located.
Final confirmation still requires measurement of:
- Screw flight OD
- Barrel bore ID
- Screw‑to‑barrel clearance
- Wear at multiple axial positions
- Local scoring
- Barrel ovality
- Corrosion
- Screw straightness
PIPLL recommends: Use process data to decide when to inspect — use dimensional measurement to decide what to replace.
PIPLL Recommended Baseline Record
One of the cheapest ways to improve future wear diagnosis is to record a baseline when the screw and barrel are new or recently rebuilt.
Parameter Baseline Material / formulation — Screw RPM — Output kg/h — Specific output kg/h/rpm — Head pressure — Melt temperature — Motor load — Heater duty — Cooling duty — Repeat the same test periodically. Then you stop asking: “Does this machine feel worse?” and start asking: “How far has performance moved away from baseline?”
Don’t Pull the Screw Blindly — And Don’t Wait for Failure
You do not need to dismantle the extruder every time production performance changes. But you also should not wait until the screw can no longer maintain output.
Monitor four things:
- 1. Specific output
- 2. Heater / cooling behavior
- 3. Feed and vent behavior
- 4. Maximum head‑pressure capability
If two or more deteriorate together under comparable operating conditions, begin spare‑part and inspection planning.
Then confirm the actual condition during scheduled teardown.
This gives the production team time to prepare replacement components before wear becomes an emergency.
Suspect Wear but Don’t Want to Stop Production Yet?
Send PIPLL your current and historical:
- Output
- Screw RPM
- Melt pressure
- Melt temperature
- Motor load
- Heater / cooling behavior
- Material formulation
- Feed or vent abnormalities
- Extruder model and screw drawing
PIPLL can help review the operating trend and determine whether the line should move into a planned screw/barrel inspection and replacement cycle.